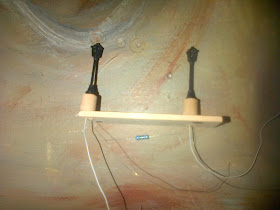
1) There are several challenges to be overcome. But they all derive from my wishing to avoid working underneath the baseboard.
The lights have to be wired as a pair in conjunction with a resistor and this involves working underneath the baseboard unless one can devise a method for avoiding that.
 |
| The red is my addition |
I hate working underneath the baseboard - especially with a soldering iron.
In the early days of the construction of the layout I devised a method for avoiding this problem: by having a hinged baseboard.
And so it was easy to install wiring under the board while standing up.
But eventually there came a point where there was so much in place on the board - especially buildings - that hinging was no longer feasible and the board was placed on fixed legs
 |
| The layout |
The red arrow in the above photo is pointing to the entrance of the "Hotel de Paris". The two lights are to be positioned there.
 |
| Two 11 mm holes through the baseboard |
The holes had to be 11 mm in diameter to accommodate the size of the lanterns at the top of the posts.
3) Constructing the wooden cradle for the lights.
To make the solution as compact as possible, the resistor is located between the two lights. The light blue plinth was cut from a strip of balsa wood. The lights sit on two cylinders which will end up fitting snugly into the two drilled holes in the baseboard. These cylinders were made by drilling holes through wooden dowelling.
 |
Heat shrink is fine rubber tubing into which you insert a bare wire or a bare joint.
 |
| Heat shrink |
 |
| Using the drier on a short section of heat shrink last year |
 |
| HS = heat shrink |
And fortunately, the lights worked.
All that remained was to go under the baseboard - but only for a moment - and push the two lights up through the two holes prepared for them. The top of the wooden plinth was given a blob of glue which stuck to the underside surface of the baseboard.
""""""""""""""""""""""""""""""""""""""""""""""""""""""""""""""""""""""""""""""""""""""""""""""""""""""""""""""""""""""""""""""""""
I'm confident that this method can be used repeatedly elsewhere on the layout.
I hope I've described the method clearly. If anything is unclear, please send questions using the "comments" facility at the foot of this episode of the blog and I'll amend the description.
*********************************************************************************
Currently listening to:
Nicky Haslam choosing his favourite records on a 2009 episode of BBC's Desert Island Discs - hilarious and very interesting.
http://www.bbc.co.uk/radio4/features/desert-island-discs/castaway/fef04d05#b00lr14v
 |
| Portrait by Vanessa Garwood |
Last night's dinner:
 |
| Cod, courgettes and black olives |
RRRRRRRRRRRRRRRRRRRRRRRRRRRRRRRRRRRRRRRRRRRRRRRRRRRRRRRRRRRRRRRRR
Just Finished Reading:
This memoir was great. It started off on a plateau of stylistic brilliance which it stayed on for the first 5/8ths of the book. To be frank, the rest of the book was not much more than a litany or even list of celebrity names and so there was almost no opportunity for the Haslam prose style to shine through. But, he redeemed himself on the the last couple of pages where he describes a return visit to his childhood home over half a century after last seeing it. Nice symmetry, since the book begins with a description of his looking out of the same window.
MMMMMMMMMMMMMMMMMMMMMMMMMMMMMMMMMMMMMMMMMMMMMM
Miscellany:
Off to hand drumming workshop this afternoon.


No comments:
Post a Comment